108 XDK: Create ngCordova Barcode Scanner Project
ngCordova was built to help make app development faster and more efficient than ever before. It gives you simple AngularJS wrappers for the most popular Cordova and PhoneGap plugins available, where you can take a picture, scan a barcode, upload a file, turn on your flashlight, get your current location, and much more with just a few lines of code. (From official ngCordova website)
This tutorial continues from http://xdk-steps.blogspot.com/2016/12/107-xdk-create-cordova-barcode-scanner.html .
If you prefer to skip the tutorial, you can download the kickstart project file here.
1) Open the Project.
2) Adding ngCordova libraries.
To use ngCordova we need to add two files
a) angular.min.js (download it here)
b) ng-cordova.js (download it here).

3) Modify app.js
Replace all codes in app.js with the following codes.
var app = angular.module('MyApp',['ngCordova']);
app.controller('MyCtrl', function($scope, $cordovaBarcodeScanner, $filter, $window) {
$scope.ver = false;
$scope.scanner = function(){
$scope.ver = false;
document.addEventListener("deviceready", function () {
$cordovaBarcodeScanner.scan().then(function(barcodeData){
var limite = $filter('limitTo')(barcodeData.text, 4);
if(limite === "http" || limite === "HTTP"){
$window.open(barcodeData.text,'_system');
$scope.ver = false;
}else{
$scope.tj = barcodeData;
$scope.ver = true;
}
}, function(error) {
$scope.ver = false;
});
}, false);
}
$scope.scanner();
});
|
Notice that this script contains AngularJS codes and Cordova code.
In contrast to the previous tutorial, we are using the ngCordova function instead of the original Cordova function. The symbol $ in the line $cordovaBarcodeScanner.scan().then(function(barcodeData) indicates that it is an ngCordova codes.
4) Modify index.html
Replace all codes in index.html with the following codes.
<!DOCTYPE html>
<html>
<!--
* Please see the included README.md file for license terms and conditions.
-->
<head>
<meta http-equiv="Content-type" content="text/html; charset=utf-8">
<!-- see http://webdesign.tutsplus.com/tutorials/htmlcss-tutorials/quick-tip-dont-forget-the-viewport-meta-tag -->
<!-- <meta name="viewport" content="width=device-width, minimum-scale=1, initial-scale=1"> -->
<meta name="viewport" content="width=device-width, minimum-scale=1, initial-scale=1, user-scalable=no">
<!-- <meta name="viewport" content="width=device-width, initial-scale=1, user-scalable=yes, minimum-scale=1, maximum-scale=2"> -->
<style>
/* following two viewport lines are equivalent to meta viewport statement above, and is needed for Windows */
/* see http://www.quirksmode.org/blog/archives/2014/05/html5_dev_conf.html and http://dev.w3.org/csswg/css-device-adapt/ */
@-ms-viewport {
width: 100vw;
min-zoom: 100%;
zoom: 100%;
}
@viewport {
width: 100vw;
min-zoom: 100% zoom: 100%;
}
@-ms-viewport {
user-zoom: fixed;
min-zoom: 100%;
}
@viewport {
user-zoom: fixed;
min-zoom: 100%;
}
/*@-ms-viewport { user-zoom: zoom ; min-zoom: 100% ; max-zoom: 200% ; } @viewport { user-zoom: zoom ; min-zoom: 100% ; max-zoom: 200% ; }*/
</style>
<!-- See explanation at the bottom of this file for info regarding placement of JS libraries. -->
<!-- These library references (below) are just examples to give you the general idea... -->
<!-- <script src="lib/mc/hammer.js"></script> -->
<!-- <script src="lib/ft/fastclick.js"></script> -->
<!-- <script src="lib/jq/jquery.js"></script> -->
<link rel="stylesheet" href="css/app.css">
<script src="cordova.js" id="xdkJScordova_"></script>
<script src="js/angular.min.js"></script>
<script src="js/ng-cordova.js"></script>
<script src="js/app.js"></script>
</head>
<body ng-app="MyApp" ng-controller="MyCtrl">
<div class="upage vertical-col left" id="mainpage">
<div class="list-group widget uib_w_1 d-margins" data-uib="twitter%20bootstrap/list_group" data-ver="1" ng-show="ver">
<a class="list-group-item allow-badge widget uib_w_2" data-uib="twitter%20bootstrap/list_item" data-ver="1">
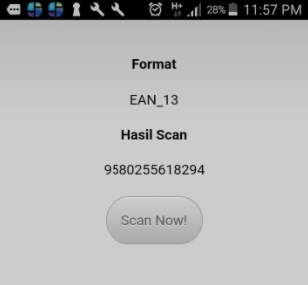
<h4 class="list-group-item-heading">Format</h4>
<p class="list-group-item-text">{{tj.format}}</p>
</a>
<a class="list-group-item allow-badge widget uib_w_3" data-uib="twitter%20bootstrap/list_item" data-ver="1">
<h4 class="list-group-item-heading">Hasil Scan</h4>
<p class="list-group-item-text">{{tj.text}}</p>
</a>
</div>
<button class="btn widget uib_w_5 d-margins btn-lg btn-danger" data-uib="twitter%20bootstrap/button" data-ver="1" ng-click="scanner()">Scan Now!</button>
</div>
</body>
</html>
|
Notice the three group of codes above (highlighted texts)
1. The first group contains the link to the required javascript files.
2. The second group is the declaration that the HTML body element is assigned a name (MyApp) and the controller code (MyCtrl). This binds AngularJS codes in Step no.3 to the UI in Step no.4
3. The third group is the HTML div containing the UI codes.
5) Simulate
Simulator cannot simulate the Cordova framework. However, Intel XDK displays a dialog saying Unhandled Exec Call. This allows the user to select Success or Failure as a result of calling BarcodeScanner.scan.

6) Build
If you have not configured the Build Requirement, read the steps in http://xdk-steps.blogspot.my/2016/12/104-xdk-how-to-build-cordova-for-android.html .
Otherwise, select the target platform and click Build.

Wait for the process to complete.
Deploy to your mobile device and check that all functions work.

No comments:
Post a Comment