1) Create a new project
1.1) Create a project eg demoJqmObjectApp1

1.2) Create an index.html project
<!DOCTYPE html>
<html>
<head>
<meta charset="utf-8">
<meta name="viewport" content="width=device-width, initial-scale=1">
<title>jQuery Mobile To Do</title>
<link rel="stylesheet" href="http://code.jquery.com/mobile/1.3.2/jquery.mobile-1.3.2.min.css">
<script src="http://code.jquery.com/jquery-1.10.2.min.js"></script>
<script src="http://code.jquery.com/mobile/1.3.2/jquery.mobile-1.3.2.min.js"></script>
</head>
<body>
<!-- Home -->
<div data-role="page" id="home">
<div data-role="header" data-position="fixed">
<h1>JQM To Do</h1>
<a href="#add" data-icon="plus" data-iconpos="notext" class="ui-btn-right" data-transition="slide" >New</a>
</div>
<div data-role="content">
<ul data-role="listview" class="todo-listview">
<li data-row-id="1" class="completed"><a href="#view" data-transition="slide" class="view" data-view-id="1"><h2>title</h2><p>desc</p></a><a href="#" data-icon="delete" data-iconpos="notext" class="mark-outstanding" data-mark-id="1">Mark as outstanding</a></li>
</div>
</div>
<!-- /Home -->
</body>
</html>
|
1.3) Emulate

2) Add Pages
2.1) Add the following codes after the Home DIV codes.
<!-- View -->
<div data-role="page" id="view" data-add-back-btn="true">
<div data-role="header" data-position="fixed">
<h1>View</h1>
</div>
<div data-role="content">
<form id="edit">
<input type="hidden" id="id" value="" name="id"/>
<input type="text" id="title" value="" data-id="" class="target" name="title"/>
<textarea id="description" data-id="" class="target" name="description"></textarea>
</form>
<a href="" data-role="button" class="delete">Delete</a>
</div>
</div>
<!-- /View -->
|
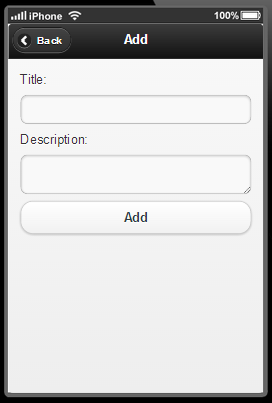
2.2) Add the following codes after the View DIV codes.
<!-- Add -->
<div data-role="page" id="add" data-add-back-btn="true">
<div data-role="header" data-position="fixed">
<h1>Add</h1>
</div>
<div data-role="content">
<form method="" action="" id="insert">
<label for="title">Title:</label>
<input type="text" name="title" id="text-basic" value="">
<label for="description">Description:</label>
<textarea cols="40" rows="8" name="description" id="text-basic"></textarea>
</form>
<a href="" data-role="button" class="add">Add</a>
</div>
</div>
<!-- /Add -->
|
2.3) Emulate

3) Add javascript function to initialize the page
3.1) Add to HEAD section after the jQuery reference codes
<script src="./js/app.js"></script>
|
3.2) Add javascript file app.js into the subfolder js

3.3) Add codes to app.js
We are going to create an object to capture events and perform tasks.
/*
Main App file
*/
// Define the app as an object to take out of global scope
var app = {
/* add more codes here later */
initialize: function() {
// Create a new store
// this.store = new LocalStorageDB();
// Bind all events here when the app initializes
$(document).on('pagebeforeshow', '#home', function(event) {
console.log("DEBUG - 1. Home pageinit bind");
// app.findAll();
});
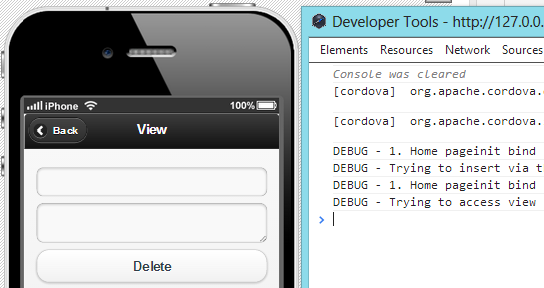
$(document).on('click', '.view', function(event) {
console.log("DEBUG - Trying to access view");
// app.findById($(this).data('view-id'))
});
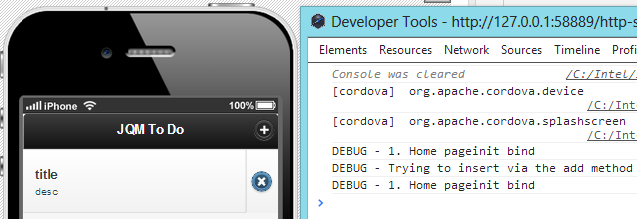
$(document).on('click', '.add', function(event) {
console.log("DEBUG - Trying to insert via the add method");
// var data = JSON.stringify($('#insert').serializeObject());
// app.insert(data);
});
$(document).on('change', '.target', function(event) {
console.log("DEBUG - Trying to update on change");
// var data = JSON.stringify($('#edit').serializeObject());
// app.update(data);
});
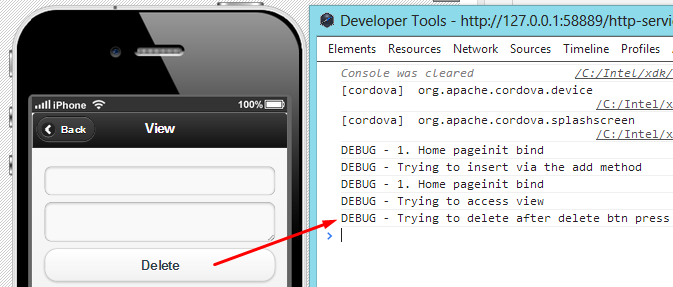
$(document).on('click', '.delete', function(event) {
console.log("DEBUG - Trying to delete after delete btn press");
// var data = JSON.stringify($('#edit').serializeObject());
// app.delete(data);
});
$(document).on('click', '.mark-completed', function(event) {
console.log("DEBUG - Mark completed pressed");
// app.markCompleted($(this).data('mark-id'));
});
$(document).on('click', '.mark-outstanding', function(event) {
console.log("DEBUG - Mark outstanding pressed");
// app.markOutstanding($(this).data('mark-id'));
});
}
};
app.initialize();
|
4) Emulate and Debug.
4.0 - Start Emulator

4.1 - Click the Add button on the Home Page.

4.2 - Click the Add button on the Add Page.

4.3 - Click the Back button on the Add Page
4.4 - Click the list item (displayed as “title” and “desc”)
4.5 - Click the Delete button on the View Page
4.6 - Click the Back button on the View Page

Download Source Files for this part:
---
No comments:
Post a Comment