-

- -

Saturday, January 24, 2015

Create jQuery Mobile Project From Cordova Starter Lite


---

Create jQuery Mobile Project From Cordova Starter Lite
This tutorial is based on Intel XDK 1621

1) Create A New Project

1-1) Click PROJECTS
1-2) Click START A NEW PROJECT
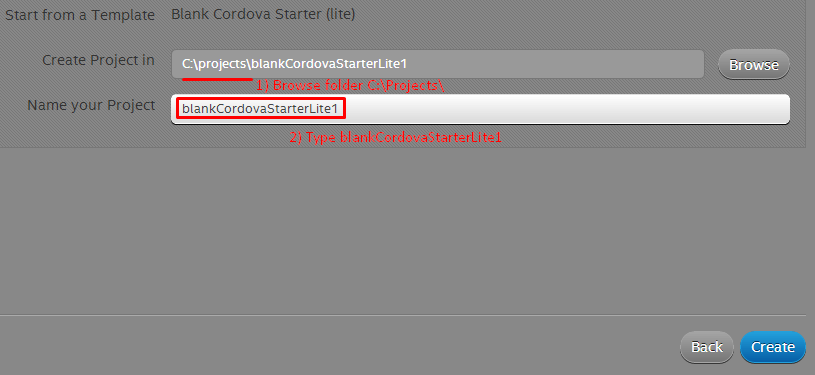
1-3) Select START WITH A TEMPLATE and then select BLANK CORDOVA STARTER (LITE)
1-3) Enter Project Name
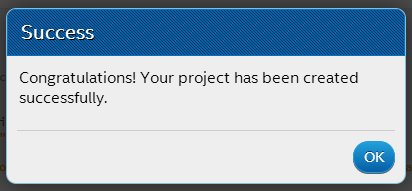
1-4) You should get Success message.

2) Add jQuery Mobile Template

2-1) Your project starts with basic files without jQuery Mobile files
The Design button is not functional at all.
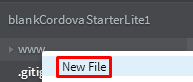
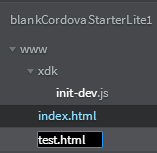
2-2) Add a new html file, eg test.html
2-3) Select jQuery Framework
2-4) Add a button to the layout
2-4) jQuery Mobile library files will be automatically added to your project
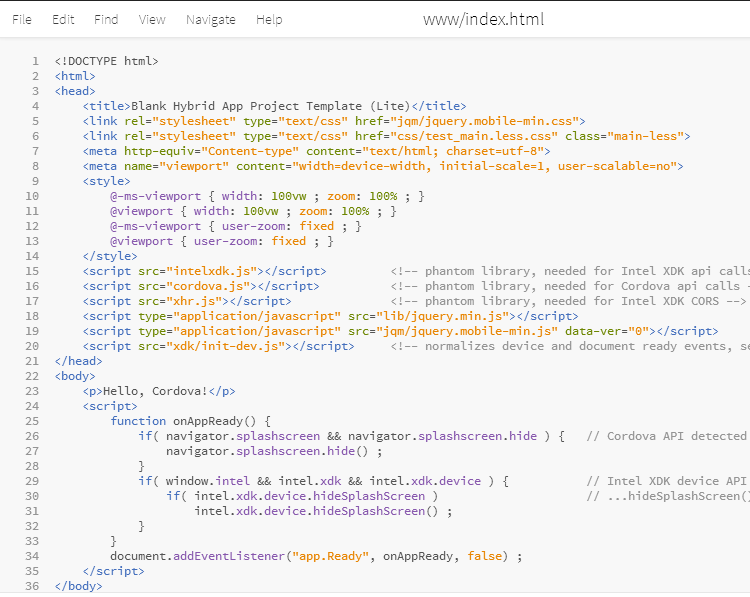
2-5) Add the following lines to the index file (refer screenshot)
The Design button will automatically be activated
<link rel="stylesheet" type="text/css" href="jqm/jquery.mobile-min.css">
<link rel="stylesheet" type="text/css" href="css/test_main.less.css" class="main-less">
    <script type="application/javascript" src="lib/jquery.min.js"></script>
    <script type="application/javascript" src="jqm/jquery.mobile-min.js" data-ver="0"></script>
2-6) If you clear up all comment codes, you would have a nice looking codes of around 36 lines only.

3) The app.ready event

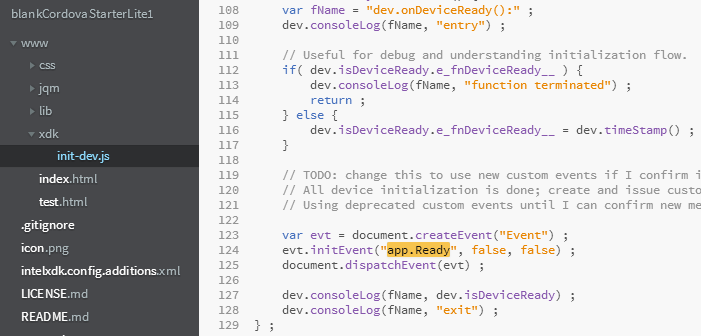
3-1) The app.ready event defined in the file init-dev.js at line no.124 is used to indicate the state at which the app has initialized all device API. At this point, calls to device API is now functional.
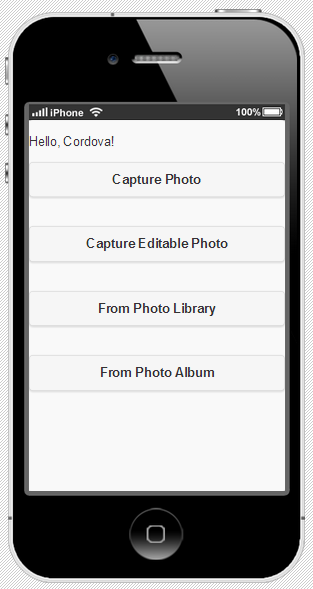
3-2) Copy the codes from Cordova Sample Page and add to index page
<body>
    <p>Hello, Cordova!</p>
        <button onclick="capturePhoto();">Capture Photo</button> <br>
    <button onclick="capturePhotoEdit();">Capture Editable Photo</button> <br>
    <button onclick="getPhoto(pictureSource.PHOTOLIBRARY);">From Photo Library</button><br>
    <button onclick="getPhoto(pictureSource.SAVEDPHOTOALBUM);">From Photo Album</button><br>
    <img style="display:none;width:60px;height:60px;" id="smallImage" src="" />
    <img style="display:none;" id="largeImage" src="" />
    <script>
        var pictureSource;   // picture source
        var destinationType; // sets the format of returned value       
        function onAppReady() {
            if( navigator.splashscreen && navigator.splashscreen.hide ) {   // Cordova API detected
                navigator.splashscreen.hide() ;
            }
            if( window.intel && intel.xdk && intel.xdk.device ) {           // Intel XDK device API detected, but...
                if( intel.xdk.device.hideSplashScreen )                     // ...hideSplashScreen() is inside the base plugin
                    intel.xdk.device.hideSplashScreen() ;
            }
            pictureSource=navigator.camera.PictureSourceType;
            destinationType=navigator.camera.DestinationType;
        }
        document.addEventListener("app.Ready", onAppReady, false) ;
    // Called when a photo is successfully retrieved
    //
    function onPhotoDataSuccess(imageData) {
      // Uncomment to view the base64-encoded image data
      // console.log(imageData);
      // Get image handle
      //
      var smallImage = document.getElementById('smallImage');
      // Unhide image elements
      //
      smallImage.style.display = 'block';
      // Show the captured photo
      // The inline CSS rules are used to resize the image
      //
      smallImage.src = "data:image/jpeg;base64," + imageData;
    }
    // Called when a photo is successfully retrieved
    //
    function onPhotoURISuccess(imageURI) {
      // Uncomment to view the image file URI
      // console.log(imageURI);
      // Get image handle
      //
      var largeImage = document.getElementById('largeImage');
      // Unhide image elements
      //
      largeImage.style.display = 'block';
      // Show the captured photo
      // The inline CSS rules are used to resize the image
      //
      largeImage.src = imageURI;
    }
    // A button will call this function
    //
    function capturePhoto() {
      // Take picture using device camera and retrieve image as base64-encoded string
      navigator.camera.getPicture(onPhotoDataSuccess, onFail, { quality: 50,
        destinationType: destinationType.DATA_URL });
    }
    // A button will call this function
    //
    function capturePhotoEdit() {
      // Take picture using device camera, allow edit, and retrieve image as base64-encoded string
      navigator.camera.getPicture(onPhotoDataSuccess, onFail, { quality: 20, allowEdit: true,
        destinationType: destinationType.DATA_URL });
    }
    // A button will call this function
    //
    function getPhoto(source) {
      // Retrieve image file location from specified source
      navigator.camera.getPicture(onPhotoURISuccess, onFail, { quality: 50,
        destinationType: destinationType.FILE_URI,
        sourceType: source });
    }
    // Called if something bad happens.
    //
    function onFail(message) {
      alert('Failed because: ' + message);
    }
    </script>
</body>
</html>
3-3) Add Camera Plug-in
3-5) Emulator
You can only view the User Interface but you cannot test the camera function.
This project must be compiled and installed into a real device.

4) Build your project

5) Installed to real device and test

6) DOWNLOAD
https://drive.google.com/file/d/0B86b-ALn-1MGRlZ0V2VGaGl1Qno0OHlROUdBZEJBN01YY05n/view?usp=sharing 

Friday, January 23, 2015

Cordova jQuery Mobile 1.4.0 Startup Files


---
Cordova jQuery Mobile 1.4.0 Startup Files
index.html
<!DOCTYPE html>
<html>
<head>        
        <meta charset="utf-8">
    <meta name="viewport" content="width=device-width, initial-scale=1, maximum-scale=1, user-scalable=no">
        <title>Mobile Apps</title>
        <link rel="stylesheet" href="css/app.css">
        <link rel="stylesheet" href="lib/jquery-mobile/css/jquery.mobile-1.4.0.min.css" />
        <script type="text/javascript" src="lib/jquery-mobile/js/jquery-1.11.0.min.js"></script>
        <script type="text/javascript" src="lib/jquery-mobile/js/jquery.mobile-1.4.0.min.js"></script>
        <script type="text/javascript" src="js/app.js"></script>
</head>
<body>
<div data-role="page" id="home">
        <div data-role="header" data-position="fixed">
                <h1>Mobile Apps</h1><a href="#settings" data-icon="gear" data-transition="slideup" class="ui-btn-right">Settings</a>
        </div>
        <div role="main" class="ui-content" id="home-content">
                <h2>Main page</h2>
                <p><a href="#next" data-transition="slide">Next Page</a></p>
        </div>
</div>
<div data-role="page" id="next">
        <div data-role="header" data-position="fixed">
                <h1>Next</h1><a href="#home" data-transition="slide" data-direction="reverse" data-icon="arrow-l" class="ui-btn-left">Home</a>
        </div>
        <div role="main" class="ui-content">
            <h2>Next Page</h2>
                <p>content</p>
        </div>
</div>
<div data-role="page" id="settings">
        <div data-role="header" data-position="fixed">
                <h1>Settings</h1><a href="#home" data-transition="slideup" data-direction="reverse" data-icon="check" class="ui-btn-right">Done</a>
        </div>
        <div role="main" class="ui-content">
                <h2>Settings</h2>
        </div>
</div>
<script type="text/javascript" src="cordova.js"></script>
<script type="text/javascript">        app.initialize();</script>
</body>
</html>
app.js
var app = {
        
    initialize: function() {
                document.addEventListener('deviceready', this.onDeviceReady, false);
       
    },
    onDeviceReady: function() {
    }
};
note: avoid anonymous functions, read http://toddmotto.com/avoiding-anonymous-javascript-functions/ 
app.css
/* Make the webviews act less like a browser, and more like an app*/
body {
    -webkit-touch-callout: none;
    -webkit-text-size-adjust: none;
    -webkit-user-select: none;
}
DOWNLOAD:
---

Monday, January 12, 2015

jQuery Mobile with JSON and Local Storage 3

---
jQuery Mobile with JavaScript Object, JSON and Local Storage
This tutorial splits a single HTML document into separate HTML documents
Continue from the previous exercise
Download the Startup Codes

6) Change single HTML document into multi-HTML document

index.html
<!DOCTYPE html>
<html>
<head>
    <meta charset="utf-8">
    <meta name="viewport" content="width=device-width, initial-scale=1">
    <title>jQuery Mobile To Do</title>
    <link rel="stylesheet"  href="http://code.jquery.com/mobile/1.3.2/jquery.mobile-1.3.2.min.css">
    <script src="http://code.jquery.com/jquery-1.10.2.min.js"></script>
    <script src="http://code.jquery.com/mobile/1.3.2/jquery.mobile-1.3.2.min.js"></script>
<script src="./js/local-storage.js"></script>
<script src="./js/app.js"></script>
</head>
<body>
    <!-- Home -->
    <div data-role="page" id="home">
            <div data-role="header" data-position="fixed">
            <h1>JQM To Do</h1>
            <a href="add.html" data-icon="plus" data-iconpos="notext" class="ui-btn-right" data-transition="slide">New</a>
        </div>
        <div data-role="content">
            <ul data-role="listview" class="todo-listview"></ul>
        </div>
    </div>
    <!-- /Home -->
</body>
</html>
add.html
<!DOCTYPE html>
<html>
<head>
    <meta charset="utf-8">
    <meta name="viewport" content="width=device-width, initial-scale=1">
    <title>jQuery Mobile To Do</title>
    <link rel="stylesheet"  href="http://code.jquery.com/mobile/1.3.2/jquery.mobile-1.3.2.min.css">
    <script src="http://code.jquery.com/jquery-1.10.2.min.js"></script>
    <script src="http://code.jquery.com/mobile/1.3.2/jquery.mobile-1.3.2.min.js"></script>
<script src="./js/local-storage.js"></script>
<script src="./js/app.js"></script>
</head>
<body>
    <!-- Add -->
    <div data-role="page" id="add" data-add-back-btn="true">
        <div data-role="header" data-position="fixed">
            <h1>Add</h1>
        </div>
        <div data-role="content">
            <form method="" action="" id="insert">
                <label for="title">Title:</label>
                <input type="text" name="title" id="text-basic" value="">
                <label for="description">Description:</label>
                <textarea cols="40" rows="8" name="description" id="text-basic"></textarea>
            </form>
            <a href="" data-role="button" class="add">Add</a>
        </div>
    </div>
    <!-- /Add -->
</body>
</html>
view.html
<!DOCTYPE html>
<html>
<head>
    <meta charset="utf-8">
    <meta name="viewport" content="width=device-width, initial-scale=1">
    <title>jQuery Mobile To Do</title>
    <link rel="stylesheet"  href="http://code.jquery.com/mobile/1.3.2/jquery.mobile-1.3.2.min.css">
    <script src="http://code.jquery.com/jquery-1.10.2.min.js"></script>
    <script src="http://code.jquery.com/mobile/1.3.2/jquery.mobile-1.3.2.min.js"></script>
<script src="./js/local-storage.js"></script>
<script src="./js/app.js"></script>
</head>
<body>
    <!-- View -->
    <div data-role="page" id="view" data-add-back-btn="true">
        <div data-role="header" data-position="fixed">
            <h1>View</h1>
            <a href="add.html" data-icon="plus" data-iconpos="notext" class="ui-btn-right" data-transition="slide">New</a>
        </div>
        <div data-role="content">
            <form id="edit">
                <input type="hidden" id="id" value="" name="id"/>
                <input type="text" id="title" value="" data-id="" class="target" name="title"/>
                <textarea id="description" data-id="" class="target" name="description"></textarea>
            </form>
            <a href="" data-role="button" class="delete">Delete</a>
        </div>
    </div>
    <!-- /View -->
</body>
</html>
---