---
Tutorial Using the App Starter and the App Framework to Create a Mobile Application
Copied from: https://software.intel.com/en-us/html5/articles/using-the-intel-app-starter-to-create-a-mobile-application
PART 2
Lesson 4: Create About Page
14) Create a New Page
14.1) Next we are going use what you just learned to make an About page.
14.2) Click from the toolbar show in the left-hand side of the Intel XDK to add a new page. You should see a ‘New Page’ created.


14.3) Click on ‘New Page’ to see the ‘Page Properties’ appear in the top right panel.

14.4) We are going to set the ‘Title’ to ‘About’ and click the blue ‘Apply’ button. You’ll see the title changed at the top of your application.

15) Add Content
15.1) Lets see what you can do on your own. Refer to the previous section if you get stuck:
a) Add a Container with 100% width and height.
b) Add another image of the monk with height of 40% and width set to 100%.
c) Add a ‘Text’ element with the following text:
Yoga is very healthy for you. You should try to do yoga every day. Try to focus on your breathing and with each movement breath in, and then breath out with the next movement. Try to breath down into your belly. Take it slow and never force your body. Let the energy flow through the top of your head to your feet grounded on the yoga mat. If you do yoga every day, you will be more flexible and live a long and fulfilling life. ~Namaste ~
15.2) At this point you should have something that looks like the following:

16) Add a Break Tag
16.1) Lets add the break tag “<br>” before “~Namaste~” to put it on a new line. Hit the blue ‘Apply’ button.

16.2) You can even add a second <br> to push it down the page.

16.3) For extra credit, you can center the text.
16.4) And last but not least, set your header to header_0 for the ‘About’ page.
Good job! Your second page is done!
Lesson 5: Create List Page
17) Create a List
17.1) Go back to the ‘Pages’ tab and add a new page with the title ‘Series’.

17.2) Go to the ‘Elements’ tab and drag a ‘List’ layout element onto the page.


17.3) We are going to have four yoga positions so click the plus sign in the ‘List Properties’ view twice.


17.4) You should see two more 'Item' entries appear.
18) Rename the List Items
18.1) Instead of ‘Items’ we will have ‘Positions’ so we need to rename what the user sees in the list. First copy the text inside ‘Item 1’ into ‘Item 2’ and ‘Item 3’.
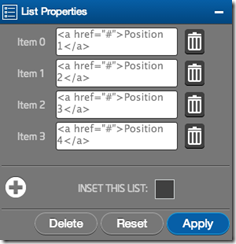
18.2) Then replace all mentions of the word “Item #” with “Position #” substituting # for a number and click the blue ‘Apply’ button.
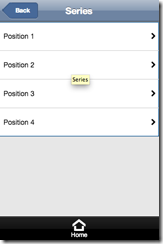
18.3) Make sure your positions list counts from 1 to 4.
18.4) We now have our positions list to start from. We will need a separate page for each position. You should already know how to create a new page…
Lesson 6: Create Content
19) Create Multiple Pages
19.1) Click on the Pages tab and add four new pages. You should have a pane that looks like the following:

19.2) Now select each page in the ‘Pages’ pane and in the ‘Page Properties’ on the right re-name each page 'Title' to “Position1”, “Position 2”, “Position 3”, and “Position 4” respectively. Remember to hit the blue ‘Apply’ button to save the ‘Title’ change.
19.3) Your right pane should look like the following:

19.4) Time to test what you remember. Refer to the previous sections if you get stuck.
19.5) We are going to repeat the previous section of instructions but we are going to use different images on each page and use the text field to describe each image.
20) Add Position 1 Image
20.1) Click on ‘Position 1’ in the ‘Pages’ pane.
20.2) Now in the ‘Elements’ tab we are going to add a 'Container’ element from the ‘Layout’ options and set the width and height to 100%;
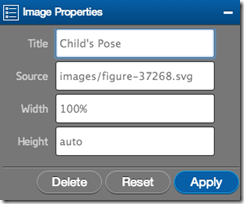
20.3) Next add an ‘Image’ element and in the ‘Image Properties’ pane we will set the following:
Title: Child’s Pose
Source: images/figure-37268.svg
Width: 100%
Height: auto
20.4) Now drag a ‘Text’ element onto the page and proceed to next step.
21) Add Position 1 Text
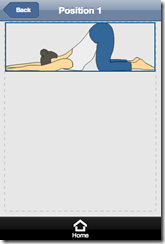
21.1) Position 1: <br>Kneel down with your arms outstretched in front of you.
21.2) In the ‘Text Styles’ pane set the text to be centered and ‘Apply’ your changes.
21.3) Position 1 page should look like the following:

21.4) Set the header to ‘header_0’.
21.5) Click save .

On to the next page…
22) Add Position 2 Image
22.1) Click on ‘Position 2’ in the ‘Pages’ pane.
22.2) Now in the ‘Elements’ tab we are going to add a 'Container’ element from the ‘Layout’ options and set the width and height to 100%;
22.3) Next add an ‘Image’ element and in the ‘Image Properties’ pane we will set the following:
Title: Bridge Pose
Source: images/man-37262.svg.svg
Width: 100%
Height: auto

23) Add Position 2 Text
23.1) Now drag a ‘Text’ element onto the page and change the text to the following:
23.2) Position 2: <br>Lye flat on your back and then slowly use your hands to arch your back into a bridge.
23.3) In the ‘Text Styles’ pane set the text to be centered and ‘Apply’ your changes.
23.4) Position 2 page should look like the following:

23.5) Set the header to ‘header_0’.
23.6) Click save .
On to content page 3…
24) Add Position 3 Image
24.1) Click on ‘Position 3’ in the ‘Pages’ pane.
24.2) Now in the ‘Elements’ tab we are going to add a 'Container’ element from the ‘Layout’ options and set the width and height to 100%;
24.3) Next add an ‘Image’ element and in the ‘Image Properties’ pane we will set the following:
Title: Twisted Back Stretch
Source: images/man-37264.svg
Width: 100%
Height: auto

25) Add Position 3 Text
25.1) Now drag a ‘Text’ element onto the page and change the text to the following:
25.2) Position 3: <br> Cross your right leg bent over your straight left leg. Try to place your left elbow on the outside of your right knee. Keep your posture straight and look behind you as you twist back.
25.3) In the ‘Text Styles’ pane set the text to be centered and ‘Apply’ your changes.
Position 3 page should look like the following:

Almost done! One more…
25.4) Set the header to ‘header_0’.
25.5) Click save .
Fourth content page…
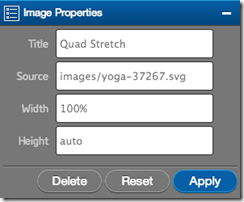
26) Add Position 4 Image
26.1) Click on ‘Position 4’ in the ‘Pages’ pane.
26.2) Now in the ‘Elements’ tab we are going to add a 'Container’ element from the ‘Layout’ options and set the width and height to 100%;
26.3) Next add an ‘Image’ element and in the ‘Image Properties’ pane we will set the following:
Title: Quad Stretch
Source: images/yoga-37267.svg
Width: 100%
Height: auto
27) Add Position 4 Text
27.1) Now drag a ‘Text’ element onto the page and change the text to the following:
27.2) Position 4: <br>Sit in a V, then bring your right leg in and stretch towards your left, try to keep your back straight and reach for your toes.
27.3) In the ‘Text Styles’ pane set the text to be centered and ‘Apply’ your changes.
27.4) Position 4 page should look like the following:

27.5) Set the header to ‘header_0’.
27.6) Click save .
You now have some content! Lets connect it to our list…
28) Link to Content Pages from a List
28.1) Return to the ‘Position 1’ content page from the ‘Pages’ pane.
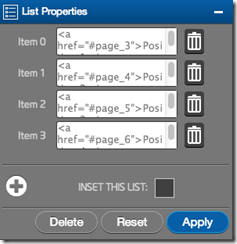
28.2) In the ‘Page Properties’ pane on the right you will notice the page has an ‘ID’. In this case ‘page_3’. This is the ID we need to link to to connect our list to this page.
28.3) Click on the ‘Series’ page and click on your ‘List’ element.
28.4) <a href=”#”> is an anchor tag element that hyperlinks to the reference given by the “=”. By using the ‘#’ symbol, we can link to other IDs of other elements. So to link to the ‘Position 1’ page from the first ‘Item 0’ in our list, we need to have href= point to “#page_3” because “page_3” is the ID for our content page for “Position 1”. We can rename the ID, what matters is that they are the same in the list for Position 1 and the actual ID name for the page for Position 1.

28.5) Likewise, we need to lookup the IDs for our other three position pages and link each page to the matching item in our list. Your ‘List Properties’ pane should look like the image below:
28.6) Save your work.
28.7) Your list now connects to the appropriate Position page. Lets add one more page to wrap up our app.
NEXT PART
---
No comments:
Post a Comment