-

- -

Saturday, January 4, 2020

DeepLearning With TensorFlowJS 4 - The intuitions behind Gradient-Descent Optimization

One-layer model is fitting a linear function f(input), defined as output = kernel * input + bias

The kernel and bias are tunable parameters (the weights) of the dense layer.

These weights contain the information learned by the network from exposure to the training data.

Initially, these weights are filled with small random values (a step called random initialization).

To find a good setting for the kernel and bias (collectively, the weights) we need two things:

  • A measure that tells us how well we are doing at a given setting of the weights. This is represented by a loss function measurement. 
  • A method to update the weights’ values so that next time we will do better than we currently are doing, according to the measure previously mentioned. This is accomplished by an optimizer method i.e. the algorithm by which the network will update its weights (kernel and bias, in this case) based on the data and the loss function.
  • The compile() method specifies 'sgd' as the optimizer and 'meanAbsoluteError' as the loss.

    'meanAbsoluteError' means that the loss function will calculate how far the predictions are from the targets, take their absolute values (making them all positive), and then return the average of those values:

    meanAbsoluteError = average( absolute(modelOutput - targets))

    'sgd' stands for stochastic gradient descent, a calculus formula to determine what adjustments should be made to the weights in order to reduce the loss.

    The fit() method is the training process of a model in TensorFlow.js. It can often be long-running, lasting for seconds or minutes. Therefore, the async/await feature is used.

    The evaluate() method calculates the loss function as applied to the provided example features and targets. It is similar to the fit() method in that it calculates the same loss, but evaluate() does not update the model’s weights.

    The training loop iterates through the following steps:

    1. Draw a batch of training samples x and corresponding targets y_true. A batch is simply a number of input examples put together as a tensor. The number of examples in a batch is called the batch size. In practical deep learning, it is often set to be a power of 2, such as 128 or 256. Examples are batched together to take advantage of the GPU’s parallel processing power and to make the calculated values of the gradients more stable.

    2. Run the network on x (a step called the forward pass) to obtain predictions y_pred.

    3. Compute the loss of the network on the batch, a measure of the mismatch between y_true and y_pred. Recall that the loss function is specified when model.compile() is called.

    4. Update all the weights (parameters) in the network in a way that slightly reduces the loss on this batch. The detailed updates to the individual weights are managed by the optimizer, which was specified during the model.compile() call.

    The loss as a function of all tunable parameters is known as the loss surface concept.

    The loss surface for this example has a bowl shape, with a global minimum at the bottom of the bowl representing the best parameter settings. 

    In general, however, the loss surface of a deep-learning model is much more complex. It will have many more than two dimensions and could have many local minima i.e. points that are lower than anything nearby but not the lowest overall.


    For larger problems i.e. when optimizing millions of weights, the likelihood of randomly selecting a good direction becomes vanishingly small. 

    A much better approach is to take advantage of the fact that all operations used in the network are differentiable and hence, to compute the gradient of the loss with regard to the network’s parameters. 

    The mathematical definition of a gradient specifies a direction along which the loss function increases. When training neural networks, the loss should gradually decrease. Therefore the weights should be moved in the direction opposite the gradient. This training process is aptly named gradient descent.

    One of the most desirable properties of deep neural networks are that they are universal approximators. Which means they should be able to cover non-convex functions as well. The problem with non-convex functions is that your initial guess might not be near the global minima and gradient descent might converge to a local minima. A solution to this problem is the stochastic gradient descent  approach.

    The term “stochastic” means drawing random samples from the training data during each gradient-descent step for efficiency, as opposed to using every training data sample at every step. In short, stochastic gradient descent is simply a modification of gradient descent for computational efficiency.

    Stochastic means nondeterministic or unpredictable. Random generally means unrecognizable, not adhering to a pattern. A random variable is also called a stochastic variable. (https://math.stackexchange.com/questions/114373/whats-the-difference-between-stochastic-and-random)


    .

    Friday, January 3, 2020

    DeepLearning With TensorFlowJS 3 - Fitting The Model


    This tutorial is based on the book Deep Learning With JavaScript (TensorFlowJS).


    https://codepen.io/tfjs-book/pen/VEVMMd

    Thursday, January 2, 2020

    DeepLearning With TensorFlowJS 2 - Plotting Tensor Data

    This tutorial is based on the book Deep Learning With JavaScript (TensorFlowJS).


    Tensors

    Tensors are the core data structure of TensorFlow.js 

    Tensors can also be thought of as containers for numbers.

    They are a generalization of vectors and matrices to potentially higher dimensions. 

    The number of dimensions and size of each dimension is called the tensor’s shape.
     
    Declaring a tensor

    // Pass an array of values to create a vector.
    tf.tensor([1, 2, 3, 4]).print();

    // Pass a nested array of values to make a matrix or a higher
    // dimensional tensor.
    tf.tensor([[1, 2], [3, 4]]).print();

    //Creates rank-1 tf.Tensor with the provided values, shape and dtype.
    tf.tensor1d([1, 2, 3]).print();

    //Creates rank-2 tf.Tensor with the provided values, shape and dtype.
    // Pass a nested array.
    tf.tensor2d([[1, 2], [3, 4]]).print();


    Plotly.js is a charting library that comes with over 40 chart types, 3D charts, statistical graphs, and SVG maps.


    https://codepen.io/tfjs-book/pen/dgQVze

    Tuesday, December 31, 2019

    DeepLearning With TensorFlowJS 1 - Train Data and Test Data

    This tutorial is based on the book Deep Learning With JavaScript (TensorFlowJS).

    The first script loads the TensorFlow package and defines the symbol tf, which provides a way to refer to names in TensorFlow.

    The second script creates two constants, trainData and testData, each representing 20 samples of how long it took to download a file (timeSec) and the size of that file (sizeMB). The elements in sizeMB and those in timeSec have one-to-one correspondence. For example, the first element of sizeMB in trainData is 0.080 MB, and downloading that file took 0.135 seconds—that is, the first element of timeSec—and so forth.

    The goal in this example will be to estimate timeSec, given just sizeMB.

    https://codepen.io/tfjs-book/pen/VEVMbx

    Wednesday, December 25, 2019

    [ebook] Neural Networks and Deep Learning free online book.

    .

    CHAPTER 1: Using neural nets to recognize handwritten digits

    In this chapter we'll write a computer program implementing a neural network that learns to recognize handwritten digits. 

    .

    CHAPTER 2: How the backpropagation algorithm works

    In this chapter I'll explain a fast algorithm for computing such gradients, an algorithm known as backpropagation.

    .

    CHAPTER 3:Improving the way neural networks learn

    In this chapter I explain a suite of techniques which can be used to improve on our vanilla implementation of backpropagation, and so improve the way our networks learn.

    .

    CHAPTER 4:A visual proof that neural nets can compute any function

    In this chapter I give a simple and mostly visual explanation of the universality theorem. 

    .

    CHAPTER 5:Why are deep neural networks hard to train?

    In this chapter, we'll try training deep networks using our workhorse learning algorithm - stochastic gradient descent by backpropagation.

    .

    CHAPTER 6:Deep learning

    In this chapter, we'll develop techniques which can be used to train deep networks, and apply them in practice.

    .

    Tuesday, November 5, 2019

    Machine Learning in JavaScript. Is it easier? difficult?


    .

    If you have tried Machine Learning before, you are probably thinking that there is a huge typo in the article’s title and that I meant to write Python or R in place of JavaScript.


    And if you are a JavaScript developer, you probably know that since the creation of NodeJS, almost anything is possible in JavaScript. You can use React and Vue to build user interfaces, Node/Express for all the “serverside” stuff, and D3 for data visualization (another area that gets dominated by Python and R).


    In this post, I will show you how to we can perform Machine Learning with JavaScript! We will start by defining what Machine Learning is, get a quick intro to TensorFlow and TensorFlow.js, and then build a very simple image classification application using React and ML5.js!

    https://towardsdatascience.com/machine-learning-in-javascript-b8b0f9f149aa

    .

    Sunday, October 27, 2019

    How to Install Node.js and NPM on Windows

     .

    Introduction

    Node.js is a run-time environment which includes everything you need to execute a program written in JavaScript. It’s used for running scripts on the server to render content before it is delivered to a web browser.

    NPM stands for Node Package Manager, which is an application and repository for developing and sharing JavaScript code.

    This guide will help you install and update Node.js and NPM on a Windows system and other useful Node.js commands.

    Tutorial on how to install, use, update and remove Node.JS and NPM (Node package manager)

    Prerequisites

    • A user account with administrator privileges (or the ability to download and install software)
    • Access to the Windows command line (search > cmd > right-click > run as administrator) OR Windows PowerShell (Search > Powershell > right-click > run as administrator)

    Note: If you want to install the run-time environment on a different operating systems, check out our guides on installing Node.js and NPM on CentOS 7.

    How to Install Node.js and NPM on Windows

    Step 1: Download Node.js Installer

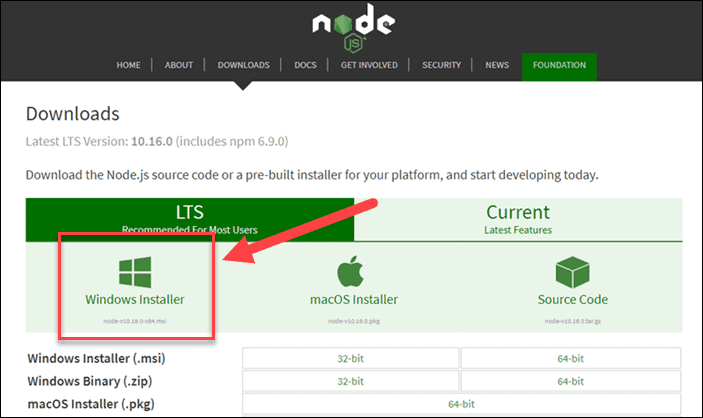
    In a web browser, navigate to https://nodejs.org/en/download/. Click the Windows Installer button to download the latest default version. At the time this article was written, version 10.16.0-x64 was the latest version. The Node.js installer includes the NPM package manager.

    Location of download link of NodeJS installer.

    Note: There are other versions available. If you have an older system, you may need the 32-bit version. You can also use the top link to switch from the stable LTS version to the current version. If you are new to Node.js or don’t need a specific version, choose LTS.

    Step 2: Install Node.js and NPM from Browser

    1. Once the installer finishes downloading, launch it. Open the downloads link in your browser and click the file. Or, browse to the location where you have saved the file and double-click it to launch.

    2. The system will ask if you want to run the software – click Run.

    3. You will be welcomed to the Node.js Setup Wizard – click Next.

    4. On the next screen, review the license agreement. Click Next if you agree to the terms and install the software.

    5. The installer will prompt you for the installation location. Leave the default location, unless you have a specific need to install it somewhere else – then click Next.

    6. The wizard will let you select components to include or remove from the installation. Again, unless you have a specific need, accept the defaults by clicking Next.

    7. Finally, click the Install button to run the installer. When it finishes, click Finish.

    Step 3: Verify Installation

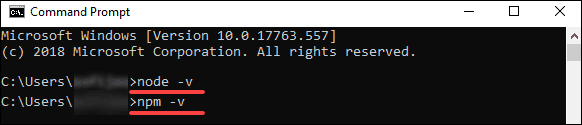
    Open a command prompt (or PowerShell), and enter the following:

    node -v

    The system should display the Node.js version installed on your system. You can do the same for NPM:

    npm -v

    Testing Node JS and NPM on Windows using CMD

    How to Update Node.js and NPM on Windows

    The easiest way to update Node.js and NPM is to download the latest version of the software. On the Node.js download page, right below the Windows Installer link, it will display the latest version. You can compare this to the version you have installed.

    To upgrade, download the installer and run it. The setup wizard will overwrite the old version, and replace it with the new version.

    How to Uninstall Node.js and NPM on Windows

    You can uninstall Node.js from the Control Panel in Windows.

    To do so:

    1. Click the Start button > Settings (gear icon) >  Apps.
    2. Scroll down to find Node.js and click to highlight.
    3. Select Uninstall. This launches a wizard to uninstall the software.

    Basic Node.js Usage

    Node.js is a framework, which means that it doesn’t work as a normal application. Instead, it interprets commands that you write. To test your new Node.js installation, create a Hello World script.

    1. Start by launching a text editor of your choice.

    2. Next, copy and paste the following into the text editor you’ve just opened:

    var http = require('http');
     http.createServer(function (req, res) {
       res.writeHead(200, {'Content-Type': 'text/html'});
       res.end('Hello World!');
     }).listen(8080);

    3. Save the file, then exit. Open the PowerShell, and enter the following:

    node \users\<your_username>\myprogram.js

    It will look like nothing has happened. In reality, your script is running in the background. You may see a Windows Defender notice about allowing traffic – for now, click Allow.

    4. Next, open a web browser, and enter the following into the address bar:

    http://localhost:8080

    In the very upper-left corner, you should see the text Hello World!

    Right now, your computer is acting like a server. Any other computer that tries to access your system on port 8080 will see the Hello World notice.

    To turn off the program, switch back to PowerShell and press Ctrl+C. The system will switch back to a command prompt. You can close this window whenever you are ready.

    Conclusion

    You should now be able to install both the Node.js framework, and the NPM package manager. You’ve also written your first node.js JavaScript program!

    The NPM framework gives access to many different JavaScript solutions, which can be found at npmjs.com.

    .

    From:

    https://phoenixnap.com/kb/install-node-js-npm-on-windows